Chuck Steak with Potatoes, Arugula, and Chili Oil

Since creating Shady Morels, my approach was always to spare you my personal life story as much as possible, and focus on what really matters — the food.

Now is no time to deviate, so I won’t go into details regarding the lengthy period of time spanning my last post to this one. I will say that my passion for creating food has only increased exponentially; I create something new almost every day, and I’m excited to share some of this with you.

Going forward, you’ll be seeing photos taken with a new lens (Canon EF-S 60mm f/2.8 Macro), which results in a 96mm equivalent when using our Canon EOS camera.

I’m also going to significantly pare down the recipe instructions. If you’re anything like me, you’re probably viewing this to gain inspiration for dinner, but not necessarily to follow verbatim. I’ll give you the basic ingredients, maybe explain why certain things work together, and briefly go over the preparation concept.

Without further adieu, here is the food.

Ingredients:

For the braised chuck steak:

Some great quality chuck steak, like 63 Acres

Quartered onion, and peeled whole garlic

White wine

For the garnish:

Small potatoes, I used siegliende

Arugula

Garlic, along with some herbs like thyme, oregano, or rosemary

Smokey chili oil, which is simply muddled fresh red chili, garlic, salt, and pimenton

Vibrant green oil for plating

Method: 

Chuck steak is seasoned with salt and pepper, seared, then braised (covered) at 315 degrees Fahrenheit with the onion and garlic for a minimum of two hours. During the last 15 minutes, I take off the lid and broil on high to develop a nice crust.

Potatoes are parboiled, then “smashed” and sautéed. Finished with herbs and garlic, and tossed with arugula off the heat.
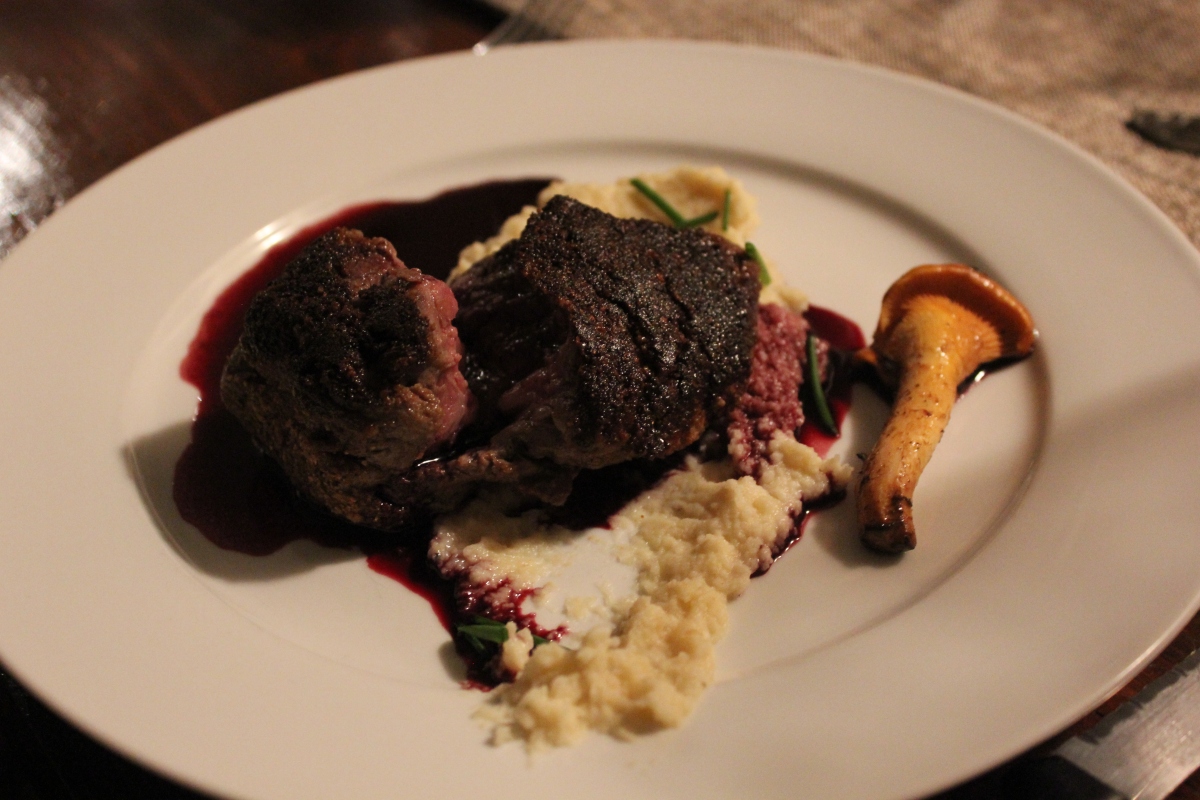
For plating:

I arranged the potatoes and arugula in a pile in the center of the plate, dappled on some of the smokey chili oil, then topped with the braised chuck roast. As a finishing touch, I did a swirl of vibrant green oil followed by the chili oil to achieve a nice visual contrast.

Why this works: 

It’s ramped up meat and potatoes, with some brightness derived from the arugula and vibrant green oil, and contrasted by the smokey chili oil. The chili and arugula is a particularly good pairing in my opinion.

I prefer beef braised with just onion, garlic, and white wine or chicken stock – rather than the typical mirepoix and red wine approach. I find the result is more true to the flavour of the beef, and lends itself well to more interesting derivations from the braised beef. More on this later!

Enjoy with a nice bottle of red, this one was enjoyed with a 2016 Francis Ford Coppola Cabernet Sauvignon.


Pea and Bacon Risotto for the Nourish Project

Back in the summer I had to opportunity to be part of a very cool project by Gordon Neighbourhood House and the very talented photographer Matt Hanns Schroeter. The project is called Nourish, it’s an intimate community-based photo series showcasing people of Vancouver’s West End community cooking in their own homes. Every week we get to look at another individual from our vibrant Vancouver community cooking a dish that is meaningful to them. I just happen to be this weeks feature!

I prepared a Pea and Bacon Risotto with seared trout while talking with Matt about the dish, cooking, the creative process, and what food means to me. It was a very cool experience, and Matt took some fantastic photos!

12507090_991458807591977_7343623336822453919_n

Check out the Nourish page for a glimpse into my kitchen and to hear some of my ramblings about food!

Nourish Tom

Photo credit Matt Hanns Schroeter


Porcini Crusted Beef Tenderloin with Red Wine Reduction and Celeriac Puree

Returning to the Pacific Northwest yesterday from a three week surfing and fish taco eating getaway to sunny Sayulita, Mexico; I’m back with a post containing some very wintery food.

The eating experiences I enjoyed in Sayulita will definitely inspire some future posts once ingredients become available.

This was actually course number three of the previously mentioned epic dinner. I will continue to write about each course of that amazing meal over time, and in no particularly logical order whatsoever.

This was a knockout dish, and one of the favourites of the night. It deserves to be accompanied by a big red, and should be the last served of the savoury dishes for obvious reasons.

I must admit, I did deviate from my typical approach to steak for this dish by cooking in a temperature controlled water bath. The results are astounding in terms of the consistency of cook; it ensures a perfect result for a very expensive steak, which can be nerve racking when using conventional heating methods.

IMG_3299

Ingredients:

For the beef:

Four 6 oz. beef tenderloin steaks

10g dried porcini mushrooms, pulverized to a powder in a spice grinder

Clove of garlic

Sprig of fresh thyme

Pinch of salt

For celeriac puree:

1 Whole celeriac (aka celery root), peeled and cut into 2 inch chunks

1 clove of garlic

2 tbsp butter

1/2 cup heavy cream

Pinch of salt and pepper

For the red wine reduction:

1 cup medium bodied red wine

A few black peppercorns

2 tbsp butter

Directions:

  1. Mix the salt and porcini powder, reserve half of the mixture. Coat the top and bottom of the steaks with the other half of the porcini-salt rub. Vacuum seal with the garlic clove and thyme, then cook in the sous vide bath at 56 degrees C for 3 hours for medium rare.
  2. Meanwhile, boil the celeriac in salted water until it can be easily pierced by a fork. Transfer to food processor and combine with the remaining ingredients. Blitz to a puree.
  3. Reduce red wine to a third over medium heat. Remove from heat and add peppercorns. Five minutes prior to servicing, re-heat, then add butter and swirl to incorporate. Now the sauce is ready to serve.
  4. Heat a cast iron pan to high and add a glug of olive oil to the pan. Remove the steaks from the sous vide bath and dry any moisture off with a paper towel. Re-coat with the porcini-salt rub, then sear steaks for 30 seconds to one minute per side. Careful not to sear too long, as the steaks are already cooked at this stage. We are just looking to caramelize and achieve a nice crust.
  5. To plate, place a dollop of the celeriac puree on one side of a plate. Using a spoon, spread the celeriac puree to form a tear drop shape. Pour the red wine reduction around the celeriac puree, and top with the steak. Garnish with a roasted wild mushroom, freshly picked chanterelles were used for this dish.

Enjoy!

Serve with an Okanagan Cabernet Franc, Cassini Cellars 2012 vintage would be a great choice!

Lamb Merguez, Cous Cous, Spiced Carrots, and Lemon Yogurt Tahini Sauce

This meal was just constructed and subsequently devoured. I feel compelled to write about the experience while basking in the aftermath of its epic-ness. There’s nothing overly complicated about this food, it’s just simple and fucking tasty. In my opinion, that is the epitome of good food.

The ingredients are Moroccan inspired. I love Moroccan food. The flavours are bold, exotic, spicy, refreshing, and soulful. Try this recipe if you find yourself making the same things over and over again, it will knock your panties off! If you end up making this over and over again, well then I can’t help you, but I also can’t blame you.

If you happen to live in Vancouver, travel to Granville Island to obtain the Merguez sausage from Oyama Meats. These guys know what they’re doing.

IMG_3447

Ingredients:

Spiced carrots:

4 large carrots, peeled and quartered

One handful of parsley, minced

Half a clove of garlic, minced

Juice of one lemon

1 tsp ground cumin

1 tsp paprika

0.5 tbsp olive oil

Pinch of salt

Lemon yogurt tahini sauce (AKA holy shit this stuff goes with anything):

2 tbsp greek yogurt

2 tbsp sesame tahini

1 tbsp runny honey

Juice of one lemon

Half a garlic clove, minced

Cous Cous:

1 cup cous cous

2 cups water

1.5 tbsp butter

Half a handful of parsley, chopped

Juice of half a lemon

Pinch of salt

4 lamb merguez sausages, from Oyama if you live in Vancouver

One poached egg

Pea shoots or parsley for garnish

Directions:

Spiced Carrots:

  1. Place 1 cup of water in a small saucepan, add carrots and bring to a boil until the carrots are cooked. About 8-10 minutes.
  2. While the carrots are cooking, combine the spices in a bowl.
  3. Drain the cooked carrots, and add to the spice bowl. Toss to incorporate, then add the rest of the ingredients. Let sit for an hour or make the day before and refrigerate. Serve at room temperature.

IMG_3431

Lemon Yogurt Tahini Sauce:

  1. Combine all ingredients in a bowl and mix. It is now ready to serve.

IMG_3442

Cous Cous:

  1. Place the cous cous and water in a saucepan with a half tbsp of the butter and a pinch of salt. Bring to a boil, then remove from heat, cover, and let stand for 5 minutes.
  2. After five minutes, fluff up the cous cous with a fork, and add the parsley, butter, lemon, and a pinch of salt to taste.

IMG_3449

To finish:

  1. Cook merguez on a cast iron pan over medium high heat until cooked through.
  2. Serve sausage over bed of cous cous, with a poached egg and parsley or pea shoot garnish. Serve carrots and lemon yogurt tahini sauce on the side.

IMG_3461

Pairs well with mint tea. If you’re looking for wine, go with Stag’s Hollow Pinot Noir.

Enjoy!


Buttermilk Panna Cotta with Honey Lemon Thyme Almonds and Pomegranate

I made this panna cotta to end an epic four course meal with wine pairings. For me, this was the highlight of the whole meal, and I’m not normally a dessert person!

It’s a simple dessert, amplified by a few exotic ingredients. The thyme really works well, and it’s an interesting touch to contrast the sweetness of the dish. The buttermilk in the panna cotta adds a tartness that balances the dish as well. Texture wise, the almonds and pomegranate add a crunch that I feel has been missing every other time I’ve eaten panna cotta!

All in all, this is a very solid dessert that I’m very proud of! You should go and make it tonight.

IMG_3306

Makes 4

Ingredients:

For the panna cotta:

2 teaspoons of powdered gelatin

2 tablespoons hot water

1 tsp vegetable or coconut oil (for ramekins)

1.5 cup heavy cream

0.5 cup granulated sugar

1.5 cup buttermilk

1 vanilla bean

For the honey, lemon, and thyme almonds:

1 cup shaved almonds

0.5 cup liquid honey, 0.25 cup reserved for plating

Fresh thyme, just the leaves from a couple sprigs. Reserve a couple of whole sprigs for plating.

Lemon zest, the long stringy type, not from the microplane. Reserve the lemon for a bit of juice as well.

Seeds from half of a pomegranate

Directions:

1. Place hot water in a ceramic bowl or ramekin, then sprinkle with the gelatin to absorb. Let stand for about 10 minutes. Meanwhile, use a paper towel to lightly spread the oil between four ramekins and prevent sticking.

2. Combine heavy cream and sugar in a saucepan and heat over medium. Stir continuously to dissolve sugar and prevent burning. Just before a boil, remove from heat and add the gelatin, buttermilk, and vanilla bean. When adding the vanilla bean, make an incision lengthwise and scrape the beans into the cream mixture with the back of the knife. Lightly stir mixture to combine, then transfer to the individual ramekins and refrigerate for at least 4 hours.

3. Heat the oven to 350 degrees F. Spread the almonds in a thin layer on a parchment or foil lined cookie sheet. Bake for 5-8 minutes, or until just starting to toast. Remove from oven, and combine in a bowl with the honey, lemon zest, and thyme leaves. Squeeze just a half of the lemon juice into the mixture, then transfer to the cookie sheet (doesn’t need to be in a thin layer at this point) and place in the oven for 5 minutes. The ingredients should combine into a sticky, oozing consistency. If the ingredients cool, it may turn hard like an almond brittle, but just pop it back into the oven for a few minutes right before servicing and it will soften up enough to plate.

4. To plate, place a dollop of honey on the plate offset from center. Invert the ramekins on the plate, and the panna cotta should slide right out. If not, heat the ramekin with some warm water for a few seconds, then try again. Sprinkle the almond mixture over the panna cotta, and top with the fresh pomegranate seeds. Garnish with a sprig of fresh thyme, and its now ready to serve.

Enjoy!

IMG_3303


Wild Mushroom Risotto

Risotto is epic. Think of it as a canvass to unleash your culinary creativity, since it is the perfect vehicle to carry an inspiring flavour to the plate! Follow the formulaic process for creating the risotto base, and then finish it with literally countless variations of accenting flavours. The basic recipe for risotto is astoundingly simple, and the key to a perfect risotto is all in the technique:

Saute onions with olive oil, then add rice and continue. Add hot stock, one ladle at a time while stirring the risotto to massage out the starch from the grains. Finish with butter and parmesan.

The perfect risotto should have an individual bite to each grain, not an overcooked rice-pudding like texture. It should also be freely flowing, and not overly stiff. This is one of the most common crimes against risotto. Let me say this, if your risotto sticks to the underside of an upside down spoon, it is too stiff! A proper risotto will slowly ooze, like a slow flow of lava!

Mushroom risotto is a classic dish for the fall. Mushroom stock can be created by soaking dried mushrooms, with porcini carrying the most prominent umami flavour for the base. The re-constituted mushrooms can then be added back into the risotto for flavour and texture. I like to finish the risotto with an assortment of whatever fresh mushrooms I can get my hands on, sautéed to bring out their earthy flavour.

Ingredients:

1 cup Arborio or Carnaroli rice

2 cups chicken, vegetable, or mushroom stock

10g dried porcini mushrooms

0.5 cup hot water

2 cups of mixed wild mushrooms, I used 1 cup of fresh shiitake and 1 cup of frozen chanterelles

1 small yellow onion, minced

1 clove garlic, thinly sliced

0.5 cup white wine or dry vermouth

Sprig of fresh thyme and sage, stems discarded and leaves chopped

0.5 cup fresh chives

Juice of half a lemon

2 tbsp butter

1 cup shredded parmesan, or other firm cheese

About 4 tbsp olive oil, enough for several “glugs” throughout the process

Salt and pepper to taste

IMG_3261

Directions:

  1. Re-constitute the dried porcini mushrooms by adding them to a bowl with the hot water. Let sit for about 15 minutes, then remove and roughly chop the mushrooms and reserve the liquid. In the meantime, add the stock to a saucepan and maintain at a simmer.
  2. If using frozen mushrooms, sauté in a spaced out layer over medium heat to remove the moisture. You can just let them sit if they are well spaced enough, until they are slightly browned and much more dry. Remove from pan and set aside for later use.
  3. Saute the fresh mushrooms over high heat with a glug of oil. Make sure to develop some good colour on the mushrooms. Remove from pan and set aside for later use.
  4. Reduce pan to medium high heat, add another glug of oil, then add the onions and garlic. Saute until onions just begin to brown, then add the rice and another glug of oil. Stir the rice and onion mixture continuously to coat all of the rice grains with a bit of oil. The idea is to toast the rice slightly before beginning to add the liquid. Just as the first rice grains begin to turn opaque, add the wine along with the sage and thyme, as well as the porcini mushrooms with their liquid and stir vigorously.
  5. After the rice absorbs about half of the wine, add a ladle full of hot stock and continue to stir. Don’t allow the risotto to become too dry throughout this process, as it will damage the individual grains and the consistency. The stirring should always be easy and the risotto flow back and forth in a wavelike motion if the pan is shaken. Continue to repeat this process one ladle of stock at a time until finished. The constant stirring is critical, as it massages out the starch of the rice grains and gives the risotto its characteristic creamy consistency. Don’t be alarmed if the rice has a slight bite to it after the stock is used up, as risotto should have this texture.
  6. Remove pan from heat once the risotto is done cooking, then add the sautéed mushrooms, butter, cheese, chives, lemon juice, and salt and pepper.
  7. Secret step: add 2 tbsp of good olive oil to the finished risotto, then gently fold ingredients together. This is the critical step for developing a lovely, oozing risotto.

Enjoy!

IMG_3266

Steelhead Trout with Chanterelles


Early autumn is my favourite time of year. West swell begins to roll into the West Coast again, re-surging the various reef and point breaks back to life; the days are still reasonably long; amazing produce is abundant and inexpensive; and a plethora of delicious wild fungi begin to pop up in the coastal temperate rainforest, just waiting to be found by those keen enough to look. It’s an inspiring time of the year when you’re obsessed with creating food.

Trout with Chanterelle mushrooms is a classic and elegant combination. The dish could be further simplified to the point where the only additional ingredient is salt and pepper and it would still be outstanding. By adding a few finishing touches, the standout flavours are not compromised, but subtly accented. Exercise restraint when adding the ingredients, especially the butter, cream, and sherry. Cooking the trout requires some finesse as well, as the success of the dish hangs on achieving a beautiful crispy skin.

IMG_3170

After a quick and unsuccessful search of the North Shore mountains in the morning, I decided to satisfy my Chanterelle fix by stopping by the Trout Lake Farmer’s market at noon

Ingredients:

2 or 3 portions cut from the freshest Steelhead or Rainbow Trout fillet that you can find (or catch)

1 tbsp olive oil

0.5 pounds of fresh golden chanterelles

1 shallot, minced

1 sprig of fresh thyme, leaves only

1 tbsp butter

1/4 cup cream

Juice of half a lemon

Dash of sherry

1 sprig of fresh dill, roughly torn

Salt and pepper


Directions:

  1. Season trout fillets generously, proper seasoning is essential when cooking trout. Heat a saute pan to medium heat, add olive oil, then add the trout fillets skin side down just as the oil starts to heat up. Do not wait for the pan to heat up to searing temperatures, since the skin will shrink and ruin the fillet if heated too quickly. Continue to cook for about 6-8 minutes, or until the skin is crisp and comes away freely from the pan. If the skin is sticking, the pan is either too hot, or hasn’t crisped enough. Flip the trout and cook for 1 minute, then transfer to a plate in a 180 degree F oven to hold while mushrooms cook.

    Trout with pilsner
    Searing trout with the company of some Main St Pilsner
  2. For the next steps, you’ll need to work quickly so that the trout does not sit more than a few minutes. Turn the heat on the pan up to high, and wait 30 seconds or until it reaches searing temperatures. Add the chanterelles to the hot pan, ensuring they are not crowded (otherwise they will steam and not caramelize). Allow to cook undisturbed for 2 minutes.
  3. IMG_3178
    This is about as crowded as I’ll ever cook mushrooms. Any more, and they will steam.
  4. Add the shallots, butter, and thyme to the pan then toss the ingredients together in the pan to incorporate. Cook for 1 minute, then add the lemon, cream, and sherry. Continue to swirl the pan and allow liquid ingredients to reduce for 1 minute, or until a sauce like consistency is reached. Remove from heat, then add half of dill.
  5. Spoon the mushrooms onto a warm plate, then top with the trout fillet. Garnish with the remaining half of dill leaves.

Enjoy!

Trout with Chanterelles

Broccolini with Garlic and Red Chilli

Broccolini and chilli form a killer combination. This dish is a go-to when you want something easy and delicious. Usually I pair this with some form of grilled meat and call it dinner. As I write this, I’m realizing it would make a perfect side for a beautiful porchetta roast, especially along with some braised fennel. After biking to work all summer, I think my heart has finally recovered enough from my last pork belly escapade to try that out soon too.

This recipe works well with either broccolini or broccoli rabe. I prefer broccoli rabe, but some people find it to be too bitter.

You can also chop it up, then add it to some orecchiette with some grated parmesan and a healthy dose of olive oil for an exceptionally easy and delicious pasta dinner.

Ingredients:

1 bunch broccolini or broccoli rabe (rapini)

2 cloves of garlic, sliced

1/2 tbsp dried red chilli flakes

3 tbsp olive oil

salt and pepper

Directions:

  1. Set a saute pan to medium heat, then add the olive oil and garlic. Sauté for about 30 seconds, then add the broccolini. Continue to cook for 5 minutes, then add the red chilli flakes. Cook for another 2 minutes, then add salt and pepper and remove from heat. The broccolini should have a bit of crunch left to it, so don’t overcook!

Enjoy!

Camping Post: Chicken with Red Wine Sauce

I’m currently on the north coast of Barkley Sound. Three days ago I was on the South coast in Bamfield. My life over the last week has involved mainly surfing and fishing for halibut and salmon. I’ve scored on both accounts. Fishing was the best I’ve ever experienced, and a beautiful southwest swell has been dishing up consistent fun sized surf for the Tofino coastlines over the past three days. Today alone I logged about nine hours in the water. Since living in Vancouver, I’m like a crack addict when I get to surf, I never know when my next session will be so I make it count! Needless to say, life is good, but I’m exhausted!

Tonight I decided to document some of the food I’ve been making back at my little basecamp at Mussell Beach. Logging so much time surfing, I wanted something nourishing and  satisfying due to the energy I’ve been expending. I decided on chicken with red wine sauce; simple, and easily accomplished with limited camping supplies. The results were delicious.

You can make this on a stove or on some coals. Although I’d love to, I didn’t have time to establish a good fire for coals, so I just used my backpacking stove and cast iron pan.

Note, the measurements and techniques in this recipe are very approximate, as they should be since I’m currently camping!

The setup, not a bad vantage point to make a delicious meal.

Ingredients:

1 chicken breast

1 shallot, julienned

1 clove garlic

A half glass of red wine

A good knob of butter

A few new potatoes, sliced

1 sprig each of rosemary and tarragon, add some chives too if they’re handy

A few glugs of olive oil

Salt and pepper to taste

Directions: 

1. Get your cast iron pan on medium-ish heat, then add some olive oil and the potatoes and sauté for ten minutes. Toss in some of the garlic and the rosemary, then season. Sauté for another 5 minutes or so, then transfer to a pot with a lid to hold and let them keep cooking for a while under their own heat.

2. Season the chicken with salt and pepper. Get the cast iron hot again, then place the chicken in the pan and monitor closely. It took me about 25 minutes of constant babysitting to get a good cook throughout without burning the chicken. Transfer to the pot with the potatoes to hold.

3. Get the cast iron pan to medium-high heat, then toss in the shallots and remaining garlic for 30 seconds. Add the red wine and let deglaze and reduce for a couple minutes, then add the butter and swirl the pan around to incorporate. Remove the pan from heat.

4. Add the potatoes and chicken back to the pan and add the tarragon and chives. Season again if needed, then eat directly out of the pan like this:

Enjoy!

Romesco Sauce

You can put this stuff on anything! There are a tonne of variations; for this one I just took one of the simplest recipes I could find and added roasted tomato and dried chilis.

I made a big batch last week, and it was gone within a few days. I put it on chicken, grilled veggies, in a grilled cheese, mixed it into a vinaigrette, and then I ran out of sauce, so even I do not know the full extent of its capability!

This sauce is even vegan, gluten free, and paleo. So it’s a great sauce to make if you have dietary restrictions.

For a quicker version, use canned roasted red peppers and fresh garlic. Omit the tomatoes.

Ingredients:

1.5 pounds fresh red bell peppers

2-3 ripe plum tomatoes

6 cloves of garlic

1.5 cups of fresh almonds

0.5 cup of good olive oil

2 Tbsp red wine vinegar, or sherry vinegar if you have it

1 Tbsp dried red chilis

1 Tbsp smoked paprika

Salt and pepper

Directions:

1. Preheat oven to 450 degrees f. Place  red peppers in a deep sided baking dish and roast for 15 minutes, flipping after about 10 minutes. Add the tomatoes and garlic, then roast for another 10 minutes. You want a nice char on the peppers, so don’t worry about burning it since they will be peeled.

2. Place the roasted peppers in a plastic bag and seal, set aside the tomatoes and garlic. This will steam the peppers and make them easier to peel.  After about 10 minutes they will be cool enough to peel. Discard the skins, stems, and peels.

3. While the peppers are cooling, lightly toast the almonds in a sauté pan. Don’t burn them.

4. Toss all the ingredients in a food processor and pulse to a consistent paste. Don’t over do it, you still want some texture in the sauce.

Enjoy!

IMG_2992